Pages

Wednesday, August 14, 2013

APOTHECARY TERRARIUM

I have always had a little apothecary jar obsession since our wedding 4 years ago. Actually they are everywhere still! After seeing the terrarium phenomenon take over I thought I would reform a few into a little mini oasis. I always say everything is so easy...but seriously this takes no skill at all....pinky swear ;)

So you will spend around $25 dollars if you don't have any of the supplies needed. I spent less than $5 and about 7 minutes not including shopping. 


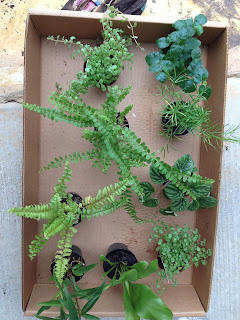
My assistant and I took a little trip to our local Pike's Nursery. Our wagon had a few extra goodies that my little buddy wanted to get. The only thing I had to get was the miniature plants. Here are the other things you will need.


Supplies: rocks, soil, plants and a jar 


Once getting your supplies you will add the rocks, then soil, then plants....DONE & DONE :) Told ya... I also added a small branch, moss, a bigger rock and a little dinosaur for my son's enjoyment! These can be personalized however you want and can be put anywhere to add some life to a room!


Good Luck & God Bless,
Brittani

Monday, August 12, 2013

BATHROOM CABINET MAKEOVER

Who has a house with builder white cabinets? My friend Julie DID. She asked me to come over and help her decorate a few things and I told her I would help her update her bathroom cabinets. This was one room she absolutely hated! I know painting can sometimes be scary, especially when you are painting over cabinets, but this was such an easy project. We are doing her kitchen next! This 2 hour project can help you take a room from eeeekkk to chic!


We first removed all the hardware and wiped down the cabinets with a wet towel. Then we removed all the doors. Looking back we probably didn't have to remove them, but it did make is easier to get all the sides. 

Once we had prepared the area with a drop cloth we got to work. The paint used was Annie Sloan Chalk Paint. The color is French Linen (my personal fav!) With chalk paints there is NO prep required...no time wasted with sanding! It required 2 coats and took about 2 hours from start to finish.


What an amazing transformation!! Her and her hubby LOVE it! And the best part...instead of spending thousands on new cabinets she spent less than $30! 

Good Luck and God Bless,
Brittani

Tuesday, August 6, 2013

COCONUT OIL STAIN

I went down to Scott's Antique Market a few weekends ago and got a old cart table. It was full of character, but needed to be pretty again. I have read all the hype about coconut oil and I use it to cook all the time, but to condition my antique cart? Why not! So here is my Tuesday Tip!

MY ANTIQUE FIND
LOTS OF BLEMISHES

I took a little sand paper to it to get rid of the big stuff and smooth it down....then I used the most amazing product ever! COCONUT OIL!! Just wiped it on and whala!! Restored!


BEAUTIFUL 

Hopefully this Tuesday Tip will help you restore something in your house to it's original beauty! 


God Bless,
Brittani


Monday, August 5, 2013

PLAY ROOM TABLE MAKEOVER

I picked up this ugly oak kids table at a garage sale for $15. At the time I had planned to give it a little face lift, but I never got around to it. I am sure you all have have a similar play room table at your house. Well I just had a free weekend and thought I would give it a little TLC. Get ready....this will be the easiest project you can do during nap time this week! $8 & 30 minutes...it is go time!


BEFORE
I went to Home Depot and got 2 cans of spray paint. Rust-oleum Seaside Gloss and Rust-oleum Chalkboard. They were each about $4.00. 
RUST-OLEUM CHALK BOARD

RUST-OLEUM SEASIDE GLOSS

I took the table and 2 chairs outside to the back yard and sprayed them. No sanding, no priming...just got right to work. They only needed one coat and I let them dry for about 30 minutes before bringing them back to the playroom. So simple it was crazy I waited a year to get this project done.

AFTER


God Bless,
Brittani

Tuesday, July 30, 2013

MY BLOG STORY

After reading several blogs it looks like everyone has a story of why they got started. Well folks here's mine...

I have always had a a really good sense of creativity and design and I am not even really sure how or where it came from. When I went to school I wanted to major in interior design, but they didn't offer it so I settled for a degree in marketing. Looking back it was probably a God thing. (Yes, I am new to blogging and didn't mispell good.)  Every decision we make in life gets us to where we are going, right? I look back and can see that huge plan He had. My second year of college I met the man of my dreams, my sweet Marky Mark. We had our fairytale wedding (before the Pinterest and Etsy era) and it was SO much fun to plan. I seriously loved every little detail that I put into that day. When we moved into our house you would have thought I was a hired decorator. We walked into the door and I handed Mark a booklet I had put together of my vision for our home. He of course laughed because back then every idea I had was crazy. We started putting my home vision booklet to work and it quickly became the sweetest first home ever. Two years after we were married we had our son, Ryland.  What a little blessing! I stopped working and stayed home with him, yet another blessing. At this point you are probably wondering if this is a life story or blog story. Simma down... I am getting there :) So a year or so passes and I get pregnant again. I adore planning for a girl. I promise you will see all her nursery pictures at some point! On April 8th of 2013 at 12:28pm a very tragic thing happened. My sweet full term baby girl, Aubriella, was born an angel. As she took her wings into the gates of heaven her Mommy's heart shattered into a million pieces. The last couple months have been some of the hardest days of my life, but I have strong faith and great support system of family and friends. Mark and I have always been very active and so I never really have time to sit down and write. During this time we finished our basement and lots of other DIY projects. I started posting pictures of my projects onto my Facebook and got such positive feedback. I then decided to start my own blog. We will see where this goes, but since you are reading this I want to thank you for being on this journey with me! 

God Bless,
Brittani